
Understanding Bow Direction and Why It Matters: A Fiddler’s Guide
The bow sets the fiddle apart from all other instruments…
With the bow, a fiddler can emote like a vocalist and groove like a drummer. Bowing styles can help listeners identify the musician from a single phrase- perhaps even a few notes. On the flip side, the bow can be a source of aggravation and keep fiddlers from unlocking their full potential. Understanding bowing ‘rules’, how to use them to your advantage, and when to break free from patterns are all aspects of creative expression. In this post, we’ll work on bow direction (ups and downs, slurs, and separates). Stay tuned for a future post on tone production.
First of all, each style of music values different components of bowings. Classical music prefers a unified sound within a section, where fiddlers are often seeking individualism. You can hear and see the difference between the two links: both beautiful and valid in their settings!
I remember sitting in the second violin section at a summer camp and misbowing a passage. The conductor shouted out, “SALMON!” and the entire orchestra came to a halt. All eyes glanced nervously at the man on the podium. He continued, “I don’t want to name names, but the salmon’s name rhymes with Lauren Rioux.” He didn’t even try to rhyme my name! And in case you don’t catch the reference, a salmon swims upstream. If you bow a passage differently than the rest of the section, your bow will be heading in the opposite direction of all the other musicians’ bows. The visual is not unlike seeing a salmon pushing against the current. Anyway, I was mortified and vowed to pay attention to bowings from then on. (I also learned to not negatively motivate students by purposely embarrassing them).
Fast forward a decade or so, to when I sat in a class at my very first fiddle camp. Darol Anger and Sara Watkins were teaching a bunch of professional classical musicians how to play Angeline the Baker. After we’d learned their variations on each phrase, I meekly raised my hand and asked, “How are we supposed to bow this?” What followed was a conversation between Darol and Sara about how each fiddler will bow the tune a bit differently. They asked the BIG QUESTION of “IS there a right way? We know there are wrong ways, but which is right?” I was simultaneously confused but also felt a weight lifted - I could figure it out myself???
Tasteful, useful, and expressive bowings are one of the most challenging topics as an educator. I find my classical background and ability to visualize bowings advantageous. But how do I convey these ideas when I’m teaching completely by ear? Here are some things I consider. I’d love to hear your thoughts and what works for you.
Understanding the Hierarchy of Beats concept.
In a typical measure of 4/4 time, there are 4 beats. The first beat is often referred to as the ‘downbeat’ because a conductor’s hand pattern always moves straight down on beat one (this is true for any time signature, by the way - no matter how many beats per measure). If you’re tapping your feet, you’ll notice that your foot also hits the floor on beat one. Beat one, aka the first beat, or the downbeat, is the most important beat of the measure.
The next most important beat is beat three. That’s because it’s the next time your foot hits the floor. So beats one and three are the ‘strong beats’.
The ‘weak’ or ‘off’ beats are the remaining two and four when you’re lifting your foot ‘off’ the floor. Two is slightly stronger than four.
Here’s a visual:

It’s worth noting here that beats 1 and 3 are *usually* when the bass is playing, and also when chords change.
Why does this matter??? Because we’ve got to think about gravity and how it changes our sound. Down bows- when we move the lower, heavy part of the bow towards the ground, are able to work with gravity. Up bows- when we move the lighter tip of the bow towards the ceiling, are working against gravity. Classical violinists spend A LOT of time working towards their up bows sounding as strong as their down bows. The reality is that we still have gravity.
So…
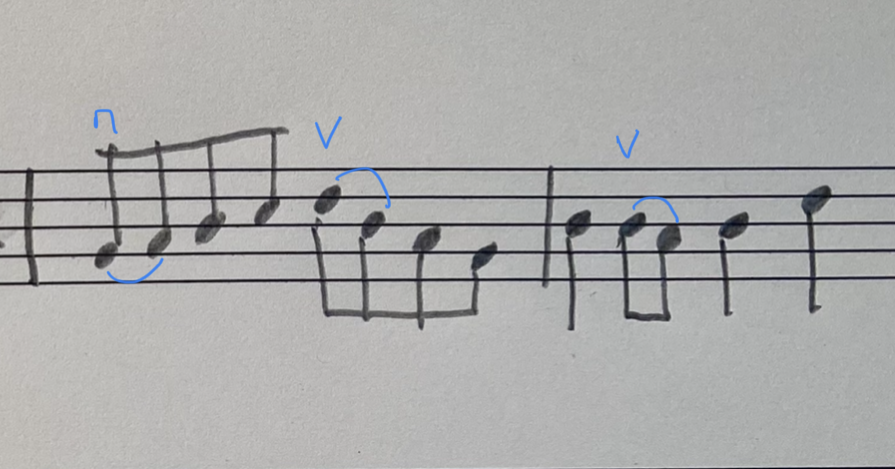
Using gravity to our advantage, we bow down on beat one, up on two, down on three, up on four.


It can be helpful to tap your foot while you play and bow this down up down up pattern. Your foot and bow move together. I remind students to “Bow with your foot!” in an effort to check and possibly correct your bow direction if you’re off for more than a beat or two.
As a “fun” experiment, you could try going against gravity and bow ‘backwards’. Keep tapping your foot while you do this. You should notice that when your foot goes down, your bow is going up. If you haven’t paid much attention to your bowing patterns before this, you might not feel a difference. But if you’ve been given bowing directions, you’ll feel that this is uncomfortable. You are effectively being a ‘SALMON’ and bowing upstream.
Hierarchy of Beats
The next iteration of the Hierarchy of Beats concept includes a measure of all eighth notes. Since there are an even number of notes in the measure, it is possible to bow down up down up etc. All the downs lay on the beats, and the ups are on the off beats.

How could you possibly disrupt this pattern? Well, rhythms create ‘problems’ to solve. How the melody divides each beat of the measure can turn your bow in the wrong direction based on the all powerful ‘hierarchy of beats’ parameter. If the melody has an uneven amount of notes, the HOB pattern goes astray.
Here’s an example: the first phrase of “Temperance Reel” starts with a measure of 7 melody notes.

If you bow every note ‘as it comes’ starting on a down bow and follow with an up bow, etc., your bowing will be ‘backwards’/salmon. All your beats will land on up bows and your off beats will land on downbows. I have seen and heard SO MANY beginner and intermediate fiddlers bow this passage (or the same rhythm on a different tune) in this backwards bowing pattern, so let’s learn how to ‘correct’ for this rhythm.

If we add a corrective slur on beat 2 (the 2nd and 3rd notes of the melody) we can right the ship immediately. You’ll notice that beat 3 (the 4th note of the melody) is back on a down bow, and the rest of the phrase adheres to the HOB pattern.
Here’s another example of adding one corrective slur to the tune Miss McLeod’s Reel. Notice the correction follows a single quarter note: the second measure of Miss McLeod’s is the same rhythm as the first measure of Temperance.

Sometimes it’s nice to add slurs to our bows even in a setting that doesn’t need correction. That’s where bowing patterns and using them frequently enough imbed them into our muscle memory is helpful.
Here’s an example of the ‘shuffle’ bowing pattern i.e. a long bow followed by two short bows/aka ‘long short-short’ or ‘slur separate slur separate’. This shuffle pattern is applied to the second measure which is constant eighth notes.

Here’s another example of the shuffle bowing pattern starting off the phrase in Miss McLeod’s followed by a corrective slur in measure 2.
You might notice that this shuffle bowing pattern ‘breaks the rules’ of the HOB concept. Here’s where breaking the rules ends up being okay, since the outcome is still ending the measure with an up bow, so you can then start the next measure with a down bow.
I should mention that Alasdair Fraser leads the charge in helping musicians break free from the shackles of their bows, urging them to unleash their inner drummers.
Playing around with bowings is a great way to do just that, and find creative solutions that provide style and interest to your sound. The key to being successful with bowings is to keep the HOB in mind and to think ahead to your destination, which is usually making sure the next measure’s down beat is a down bow.
Here are some examples of creative bowings on Temperance and Miss McLeod’s. Give them a try and if you have a preference on sound and feel.


Some of these bowing patterns feel better or worse depending on string crossings. So while you might love a pattern on one tune, you might dislike it on another with exactly the same rhythm because of where the melody changes strings.
A good option for working on bowing patterns is to learn bowings from your favorite fiddlers, and the source recording of the tune. This will help you emulate your heroes. Sitting in jam circles just behind and to the right of Brittany Haas and Bruce Molsky and bowing along with them helped me learn a tremendous amount about Old Time bowing. Here’s a great guest post written by Britt that mentions and shows bowing patterns.
Pickup Notes
Another way to work on bowing outcomes is with pickup notes. I have a YouTube lesson as a part of this post on How to Start Improvising on Fiddle Tunes. Depending on how many pickup notes you use can determine the bowing options you choose. Remember, the outcome of the downbeat on the down bow is always the destination. Watch the lesson on pickups and then try finding one, two, and three note pickup options for Temperance and Miss McLeod’s while you play with bowings.
I’ve bowed out some options for you here.
1 Note Pickups

2 Note Pickups


3 Note Pickups


Alright, I hope these descriptions and explanations are helpful in understanding the tremendous creative power you have within your bow. For more help learning Temperance and or Miss McLeod’s Reels, working on bowing patterns and grooves, how to hear chord progressions so you can jam and improvise, fun challenges and bi-monthly lessons with me, Lauren, you can check out my All-Access Curriculum. I’d be thrilled to work with you.
Until next time,
Be well.
xoL